Facebook graph api , I learned out to do something called Facebook graphing.
What is Facebook graphing?
Facebook graphing is a technique by which you can collect your Facebook data and display it on your website. The Facebook data can be taken from any page in your Facebook profile or your timeline posts. There are certain limitations to it which we will see further.
To understand even much better we will take a look at how it works.
So now it’s very crucial here to follow each of the above steps mentioned here.
Steps involved:
Facebook Graph API (Points to remember) :-
We will be following the below-mentioned steps one by one :
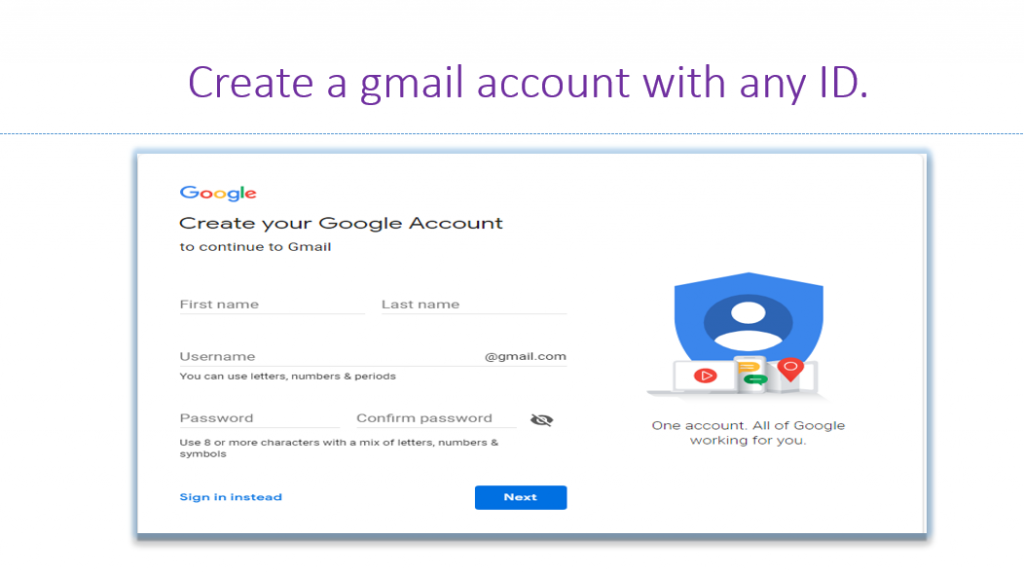
- We need to create a Gmail/Email account before this.
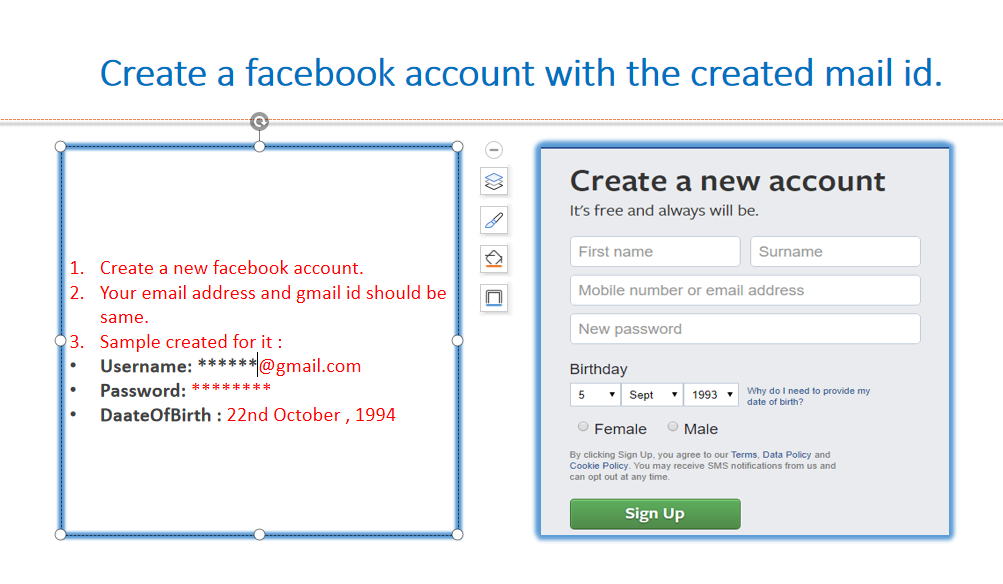
- Next, we need to create a Facebook account to the above-registered email id.
- Next, we need to create a Facebook page where you need to collect the posts.
- Next, we need to graph API to get the output (posts, messages, id, email, etc) in JSON format.
- Next, we need to create an application.
- Next, we need to turn on the application.
- Next, we need to create an authentication token.
- Next, we need to extend the expiry date for the authentication.
- Get the JSON output by passing the parameter.
1.Before Facebook graphing, you need to set up your Gmail id or any email id. This particular mail id will be used to make a business account on Facebook.
2. Next, you need to make a Business account with the above mail id . You can ignore the above-mentioned steps if you already have a Facebook account and you want to display the content from the profile id which you already have.
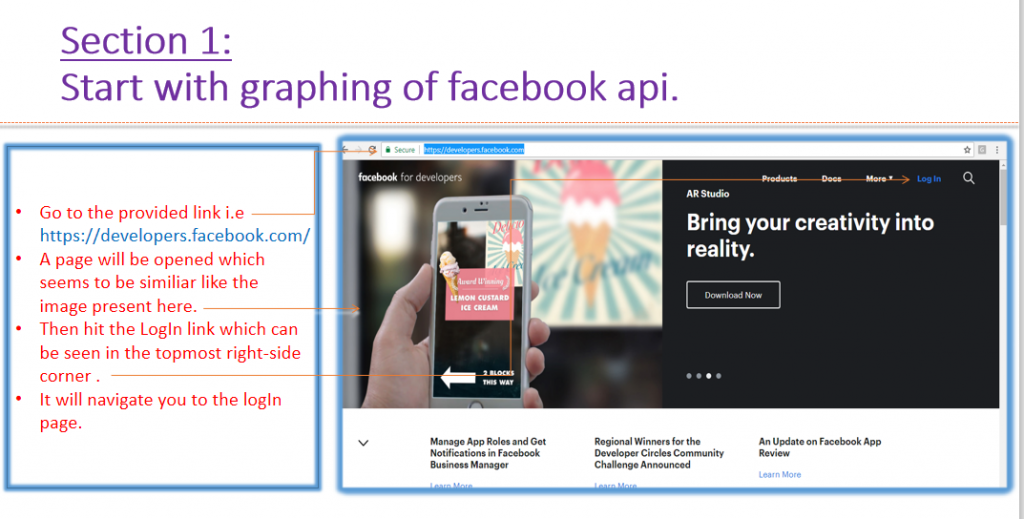
3. Start with Facebook Graph api .
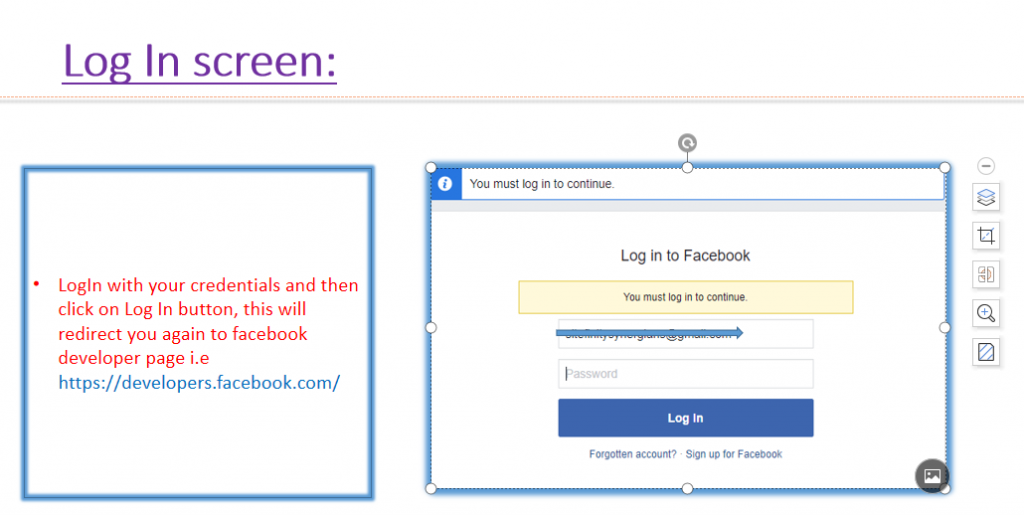
- Go to the provided link i.e https://developers.facebook.com/
- A page will be opened which seems to be similar to the image present here.
- Then hit the login link which can be seen in the topmost right-side corner.
- It will navigate you to the login page.
Log in with your credentials and then click on the login button, this will redirect you again to Facebook developer page i.e https://developers.facebook.com/
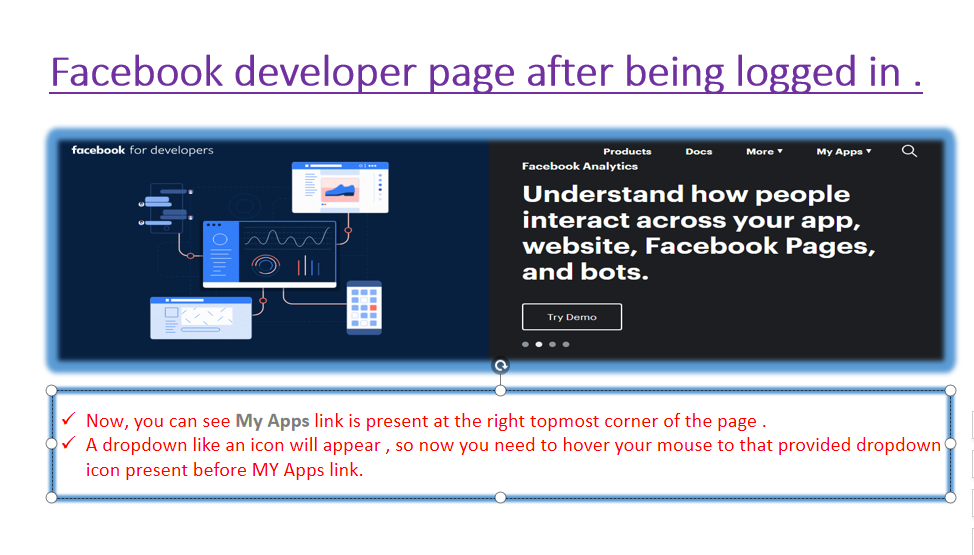
Now, you can see My Apps link which is present at the right topmost corner of the page .
A dropdown like an icon will appear, so now you need to hover your mouse to that provided dropdown icon present before MY Apps link.
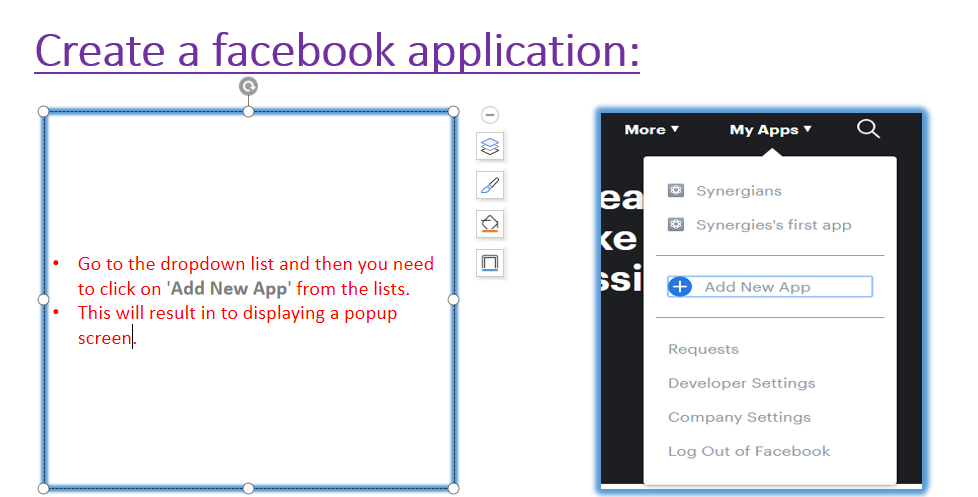
3. Create a facebook application:
- Go to the dropdown list and then you need to click on ‘Add New App’ from the lists.
- This will result in displaying a popup screen.
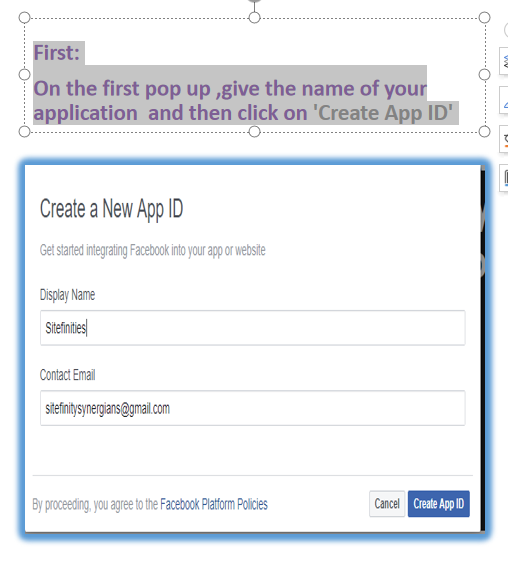
First:
On the first pop up,give the name of your application and then click on ‘Create App ID’
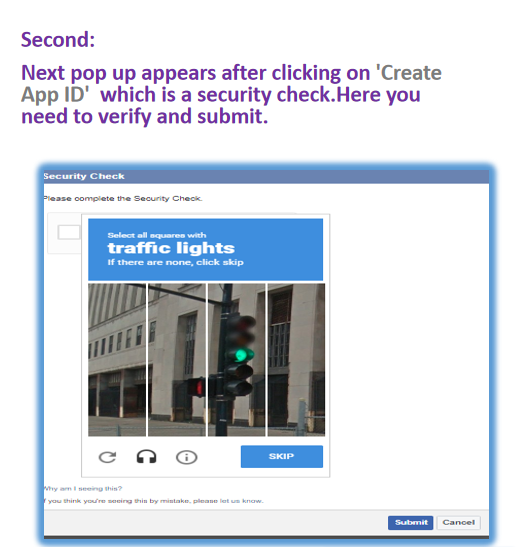
Second:
Next pop up appears after clicking on ‘Create App ID’ which is a security check.Here you need to verify and submit.
After the successful creation of the application, the screen looks like below pic.

4. Turning on the application.
- First need to turn on the application for which you need to do some changes in the ‘Settings‘ .
- Click on the settings.
- Settings > Basic
- Then click on the ‘Basic ‘, and this will navigate you to a new page https://developers.facebook.com/apps/******122112/settings/basic/

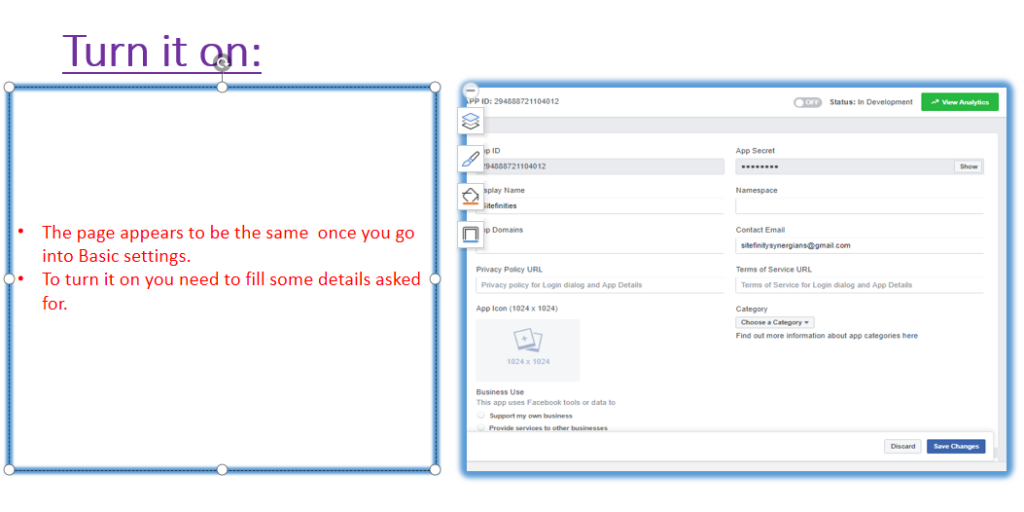
5. Turn it on:
a. The page appears to be the same once you go into Basic settings.
b. To turn it on you need to fill some details asked for.
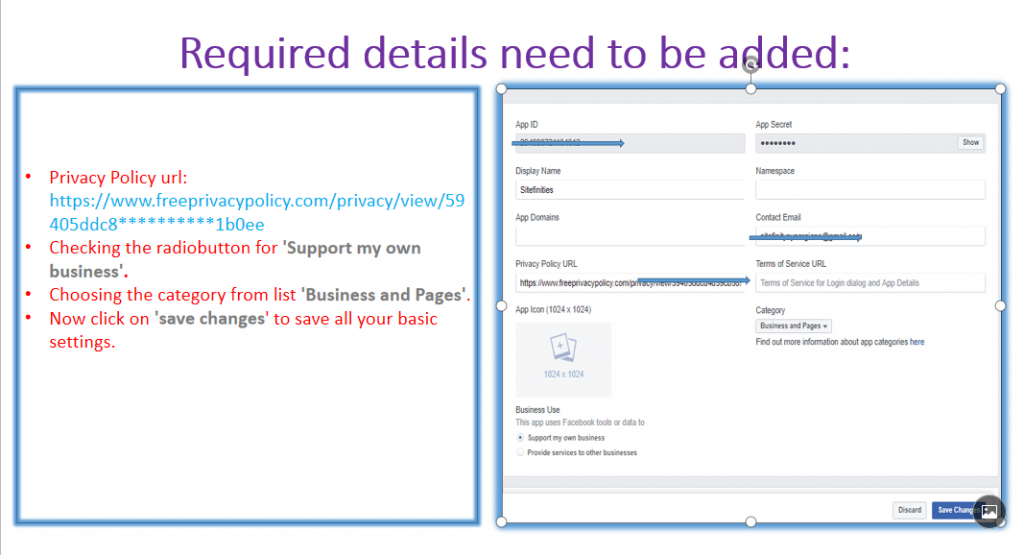
Required details need to be added:
Privacy Policy URL: https://www.freeprivacypolicy.com/privacy/view/59405ddc8**1b0ee
Checking the radio button for ‘Support my own business’.
Choosing the category from list ‘Business and Pages’.
Now click on ‘save changes’ to save all your basic settings.
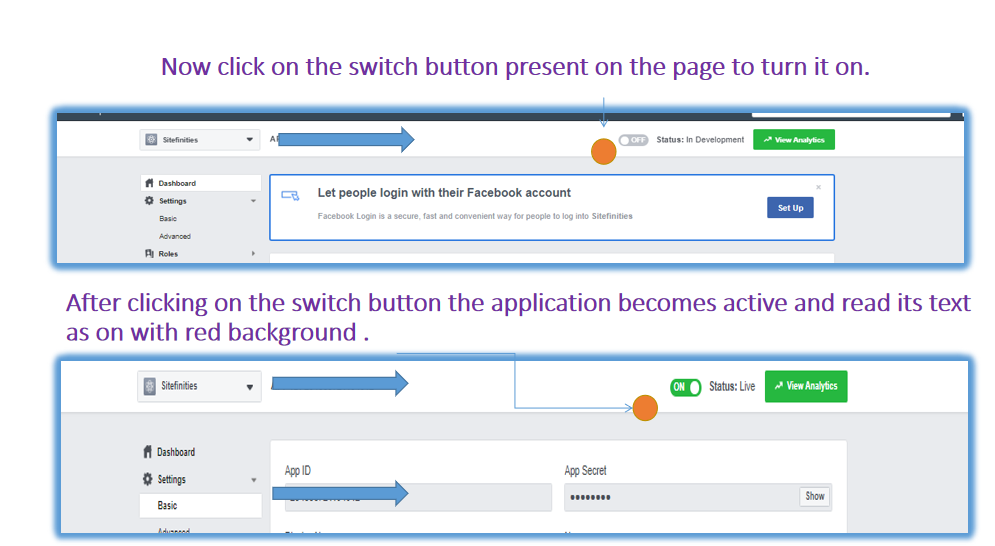
Now click on the switch button present on the page to turn it on.
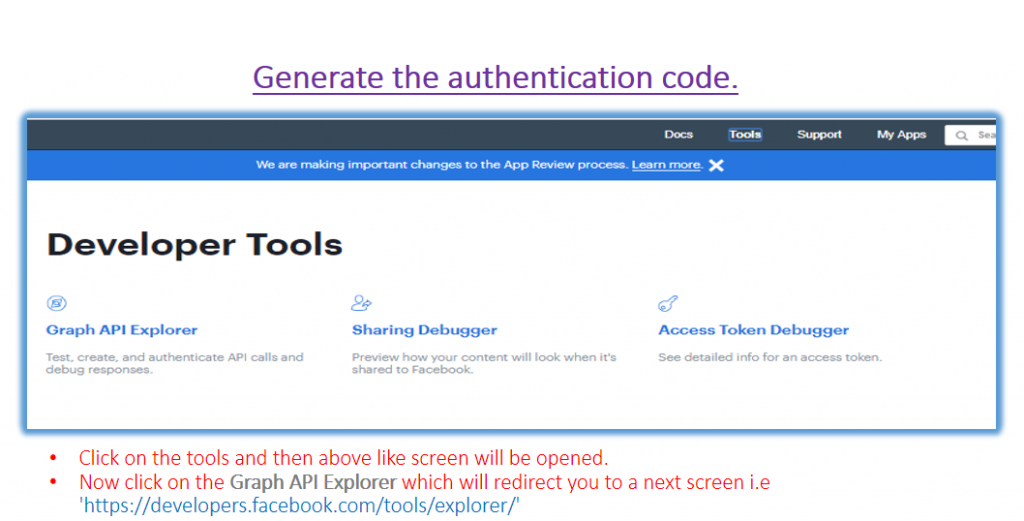
6.Generate the authentication code.
1.Click on the tools and then above like screen will be opened.
2.Now click on the Graph API Explorer which will redirect you to a next screen i.e ‘https://developers.facebook.com/tools/explorer/’
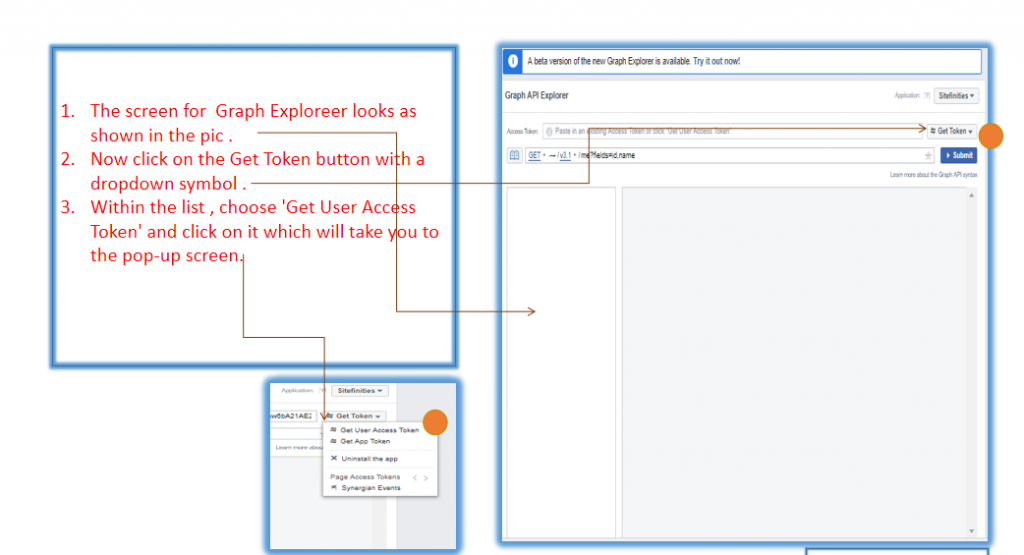
1.The screen for Graph Explorer looks as shown in the pic.
2.Now click on the Get Token button with a dropdown symbol.
3. Within the list, choose ‘Get User Access Token’ and click on it which will take you to the pop-up screen.
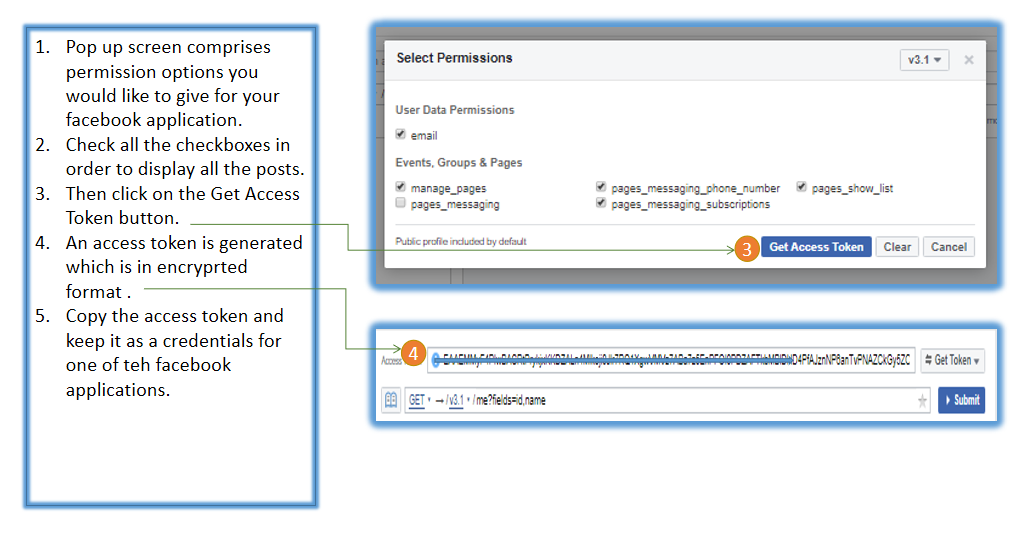
- Pop up screen comprises permission options you would like to give for your Facebook application.
- Check all the checkboxes in order to display all the posts.
- Then click on the Get Access Token button.
- An access token is generated which is in an encrypted format.
- Copy the access token and keep it as a credential for one of the Facebook applications.
7. Getting the token for the page.
- Now you need to go the button present just beside the textbox with a dropdown icon.
- The dropdown list comprises all the pages present in your Facebook graph api account.
- Choose the page for which you need to extract its API contents.
- This will generate a new token and now you need to save the session of your token as well as extend the token life period.

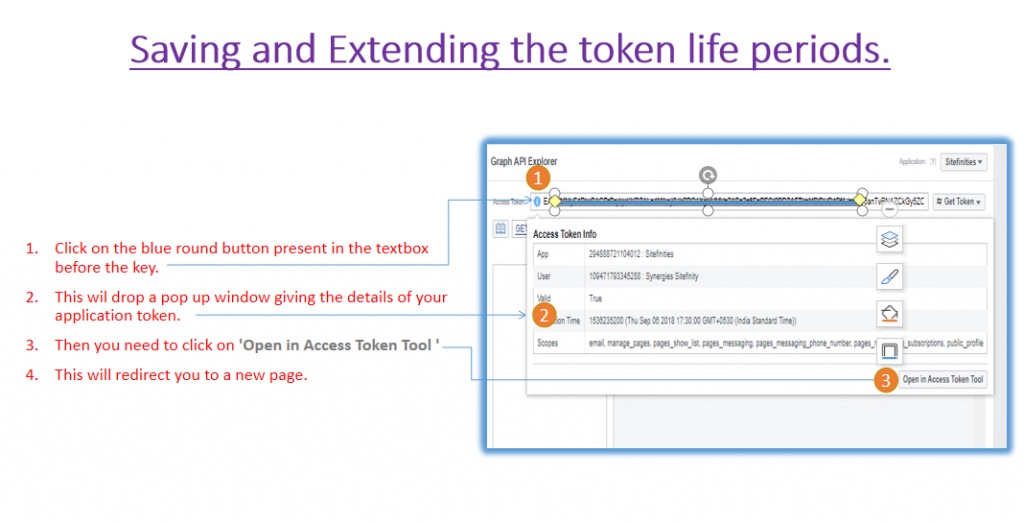
8. Saving and Extending the token life periods.
- Click on the blue round button present in the textbox before the key.
- This will drop a pop-up window giving the details of your application token.
- Then you need to click on ‘Open in Access Token Tool ‘
- This will redirect you to a new page.
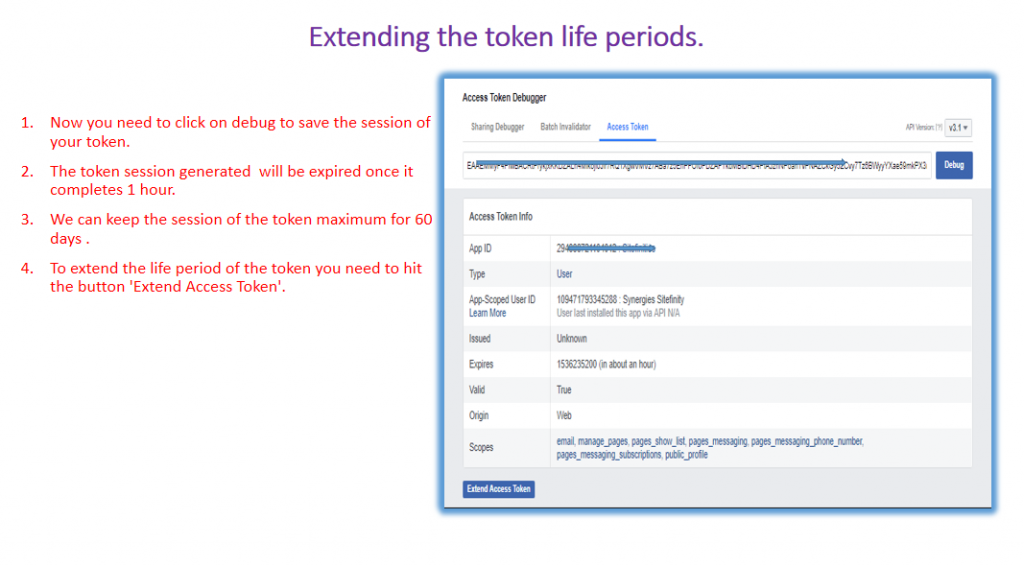
Extending the token life periods.
- Now you need to click on debug to save the session of your token.
- The token session generated will be expired once it completes for 1 hour.
- We can keep the session of the token maximum for 60 days.
- To extend the life period of the token you need to hit the button ‘Extend Access Token’.
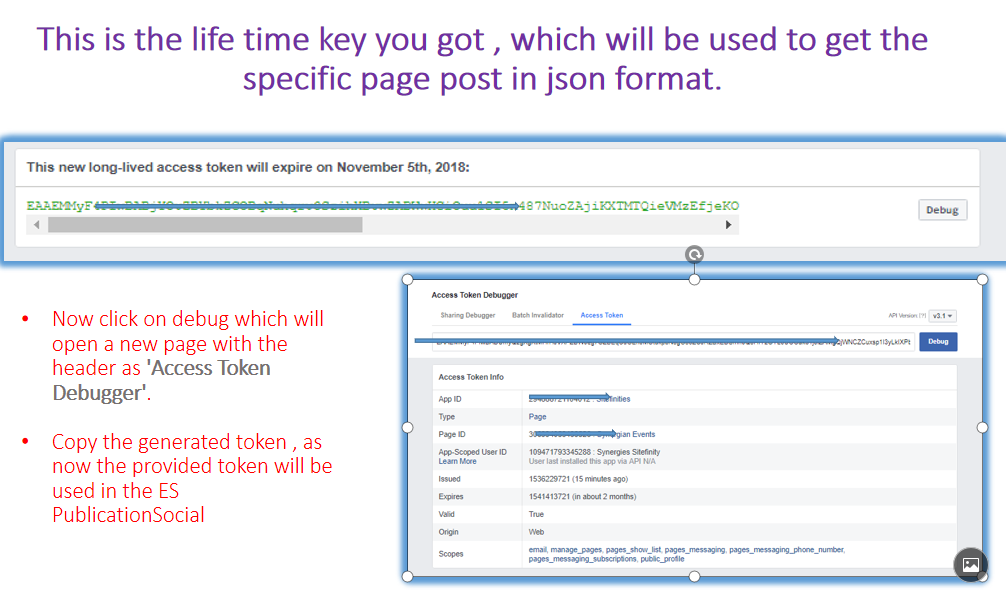
Thus you got the lifetime key you got, which will be used to get the specific page post in JSON format.
Facebook graphing is done.
Now, To collect the data from the generated token you can use ajax call to retrieve the data from Facebook API.
Below is the sample jquery ajax call to retrieve the data.
    $.ajax({
                cache: false,
                type: "GET",
                contentType: JSON,
                url: 'https://graph.facebook.com/v3.1/me?fields=posts&access_token=' + token,

                success: function (res) {
                  //  console.log(res);
                    var counter = 0;

                    var response = [];
                    response = res.posts.data;
                    //var statichtml = '<div class="news-and-announcements tab-anchor-content section-margin-top-50">'+'<div class="container">'
                    //'<div class="section--hdr">' + '  <h2 class="second-hdr-underline">Social</h2>' +'</div>' + ' <div class="row">';
                    for (var i = 0 ; i < response.length ; i++) {
                       // if (response[i].story == undefined) {
                            if (counter < 3) {
                                //var dates = new Date(Date.parse(response[i].created_time, "MM/dd/yyyy"));

                                //var date = dates.toString().substring(0, 15);

                                //var htmlelement = ' <div class="col-md-4">' + '<h5>' + date.substring(0, 15) + '</h5>'  +
                                //   '<p>' + response[i].message.substring(0,250) + '</p>' + '</div>'
                                var d = new Date(response[i].created_time);
                                if (response[i].message != undefined && response[i].message != "" && response[i].message != null) {


                                    var msg = response[i].message;
                                    if (msg.length > 250) { msg = msg.substring(0, 249) + '...'; }
                                    var htmlelement = ' <div class="col-md-4">' + '<h5>' + response[i].created_time.toString().substring(0, 10) + '</h5>' + '<p>' + msg + '</p>' + '</div>'


                                    $('#socialfeed').append(htmlelement);
                                    counter = counter + 1;
                                }
                            }


                      //  }
                    }

                },
                error: function () {
                    //alert('error');
                    $('.socialFeed').hide();
                },
                complete: function (res) {


                }
            })

        }
URL: ‘https://graph.facebook.com/v3.1/me?fields=posts&access_token=’ + token,
token =Here, you need to keep your generated token.
So, It’s done. Let me know if you encountered any problem in any section. This is called Facebook graphing.
Points to remember:
1. The generated token expires in 60 days
2. If it shows the alert as an error, it means either the token is not valid for getting the specific page posts.
You can visit https://developers.facebook.com/docs/graph-api/ to learn more the contents about Facebook graph api .
Thank you.